
Learn how to create a DIY picture frame gallery wall with budget tips, layout tools, renter-safe hacks & stylish ideas—no design degree required!
Introduction
✨ “This Wall Is Driving Me Crazy…”
You know the feeling, right?
You walk into your living room, bedroom — maybe even that hallway you keep ignoring — and stare at a giant blank wall. It’s just sitting there. Empty. Cold. Kind of judging you.
You think: I should do something with this.
But what? And how?
Maybe you’ve saved a hundred gallery wall ideas on Pinterest but still haven’t picked up a hammer.
Maybe you’re not even sure where to start — or you’re worried about messing up your wall, especially if you’re renting.
👉 Good news: You’re in the right place.
We’ve created this guide just for you — whether you’ve got a full box of art prints or nothing but your phone and a dream.
🛠️ You Don’t Need Fancy Tools, a Big Budget, or a Design Degree
Seriously.
Creating a DIY picture frame gallery wall isn’t just for interior designers or people with Pinterest-perfect homes. Anyone can do this — even on a shoestring budget.
We’ll walk you through everything:
- How to choose the right frames and photos
- How to plan a layout that actually works (without putting 27 holes in the wall)
- How to hang your gallery even if you can’t use nails (hello, renters!)
- And how to give it your personal touch — from family photos to DIY kid art
It’s all here — step-by-step, beginner-friendly, and stress-free.
🎁 Bonus Tools Inside This Guide
To make things easier, we’re also giving you some helpful tools along the way:
- ✅ A free Gallery Wall Layout Generator to help you visualize before you hang
- ✅ A printable planning worksheet you can sketch on (or use digitally)
- ✅ Simple renter-friendly hacks so you don’t need to patch holes later
You won’t just finish this with a wall you love — you’ll enjoy the process, too.
💬 Real Talk: You’re the Designer Now
Think of your gallery wall as your personal museum.
Whether it tells the story of your family, your travels, your taste in art — or just your ability to finally get things hung straight — this is your chance to put you on display.
And you don’t have to do it alone.
Let’s get started.
👉 Also Read: How to Build a Garden Bench from Leftover Wood
Start with the Story: What Do You Want to Say With Your Wall?
🖼️ Your Wall, Your Story
Before you pick up a single frame, step back for a second and ask yourself this:
“What do I want this wall to say?”
Because your gallery wall isn’t just decoration — it’s a conversation. It’s a feeling. It’s the first thing someone sees when they walk into your home and the thing you see every day.
You get to choose what that story is.
💡 Pick a Mood, Not Just a Look
Are you going for cozy and sentimental? Bright and playful? Clean and modern?
Here are a few quick examples to spark ideas:
- Family-focused wall: Wedding photos, baby pictures, family vacation shots
- Travel memories wall: Maps, city prints, tickets, postcards, snapshots of your adventures
- Minimalist modern wall: Black-and-white photography, abstract shapes, neutral tones
- Whimsical & fun wall: Pops of color, mixed patterns, playful art and quotes
Your gallery wall doesn’t have to follow strict design rules — it just has to feel like you.
🎨 Create a Theme (Even a Loose One Helps)
Having a theme makes it easier to decide what to hang — and what not to.
Your theme can be super clear (like “all black & white family photos”) or just loosely connected (like “stuff that makes me smile”).
Some ideas you can mix and match:
- Color scheme: All neutrals, or a mix of blues and greens
- Frame style: All gold frames, or a mix of woods
- Subject: Only people, or only places
- Vibe: Cozy cottage, mid-century modern, vintage eclectic
📌 Pro Tip: Start with just one piece you love, and build the wall around it.
🧠 Don’t Be Afraid to Mix It Up
A common mistake people make — especially when using personal photos — is choosing only faces.
It’s beautiful to showcase your family, but if every frame is a portrait, the wall can feel a little flat.
So add contrast:
- Include quotes, abstract art, or nature prints
- Try a shadow box with a keepsake (a key, dried flower, or baby shoe)
- Use close-up textures (like fabric swatches or architectural details)
This adds depth, balance, and makes the wall more visually interesting.
❤️ Show Your Personality (And Don’t Overthink It)
Remember: This wall is yours. There’s no need to copy a Pinterest board exactly.
Your favorite memories, your weird little finds, your kids’ art — they all belong here.
You’re not just decorating a wall.
You’re creating something meaningful.
Let your wall tell a story only you could tell.
Gather the Frames (Or DIY Them!)

🖼️ The Secret to a Stylish Wall? It Starts with the Frames
Before you think about what’s inside the frames, let’s talk about the frames themselves.
You don’t need to spend a fortune.
And you definitely don’t need matching designer sets.
In fact — some of the best gallery walls come from mixing high and low pieces, different shapes, and even a few handmade gems.
Let’s break down your options.
🛒 Shop Smart: Affordable Places to Find Frames
You can build a beautiful collection of frames without blowing your budget.
Here are some tried-and-true spots to check out:
- IKEA: Clean, modern basics in all sizes
- Target: Great mid-range styles, often with trendy details
- Thrift stores: Goldmine for unique vintage finds
- Flea markets or yard sales: Cheap prices, lots of character
- Dollar stores: Surprisingly great for small frames or kids’ art
👉 Pro Tip: Don’t worry if the colors don’t match. You can always paint them!
🎨 Mix and Match — Or Keep It Cohesive
You have two options when creating a gallery wall:
1. Eclectic Mix
Use different sizes, colors, and shapes.
This gives your wall a collected over time vibe. Think cozy, artsy, or vintage.
2. Unified Look
Stick to one frame color (like all black or all wood tones) but vary the sizes.
This creates a cleaner, more modern feel.
Either way works beautifully — it’s all about your style.
📌 Try This: Lay the frames on the floor and move them around like puzzle pieces before committing.
✂️ Want to DIY? Make Your Own Frames (Yes, Even Kids Can Help!)
If you’re working on a school project, decorating on a tight budget, or just feeling crafty, DIY picture frames can be a fun and personal touch.
Here are some easy ways to make your own:
- Cardboard frames: Cut out shapes from recycled boxes and decorate with paint or fabric
- Craft paper frames: Use thick scrapbook paper or poster board to make colorful mats
- Popsicle stick frames: Glue sticks into a square and paint or glitter them — great for kids’ art or small photos
- Washi tape borders: Stick your photo to the wall and outline it with patterned tape — zero damage!
These are perfect for adding a handmade, playful feel to your gallery wall.
❤️ Frame the Memories — Not Just the Pictures
Here’s the thing: not everything on your wall has to be “perfect.”
Sometimes, the $1 thrifted frame or your kid’s painted popsicle stick creation tells more of your story than a $50 store-bought one.
So whether you’re framing a postcard, a professional photo, or a hand-drawn heart — give it a home.
This wall is about you, after all.
Select & Prep Your Art (Yes, You Can Print at Home!)

🖼️ You Don’t Need Expensive Art to Make Your Wall Look Amazing
Here’s a little secret no one tells you:
You don’t need to spend hundreds of dollars on art to make your gallery wall look like it came out of a magazine.
In fact, some of the most stunning gallery walls feature family photos, kid drawings, or art you printed right at home.
It’s not about what’s in the frame — it’s about how it feels.
🖐️ What to Include? Anything That Feels Like You
You can mix and match all kinds of pieces to build your wall’s story. Here are some fun and meaningful options:
- 📸 Family photos — black & white or color, candid or posed
- 🧒 Kids’ artwork — let them help pick which ones to frame
- 🖌️ Art prints — modern, vintage, abstract, or illustrations
- 💬 Quotes or words — favorite sayings, song lyrics, or poems
- 🧳 Travel mementos — postcards, ticket stubs, or small maps
You don’t need a theme — but if you want a “flow,” pick a loose color scheme or subject (like nature, family, or places).
🛒 Where to Find (or Create) Affordable Art
You don’t have to be an artist — and you don’t have to buy expensive prints.
Here’s where to look for beautiful, budget-friendly art:
- 🎨 Etsy: Downloadable printables — stylish and super affordable
- 📚 Public domain archives: Check sites like The Met Open Access or RawPixel Public Domain
- 🧑💻 Canva: Free design templates for quotes, posters, or collages
- 🖨️ Print at home: Use your own printer or a local print shop
Even just printing in black and white can look chic and intentional.
✨ The Secret to Making Cheap Art Look Fancy: Oversized Mats
Here’s a pro-level trick — even if you’re decorating on a budget:
Use oversized mats to make small or simple art look high-end.
Instead of filling a frame edge-to-edge, place your image in the center with a thick white border (the mat). This creates a clean, gallery-style finish.
For example:
- Frame a small quote in an 8×10 mat, then place it inside an 11×14 frame
- Use a child’s simple drawing in a large mat for a modern-art effect
This adds breathing space and makes everything feel more elevated.
💡 Tip: Mix Meaning With Beauty
Want to make your wall feel personal and not just pretty?
Try combining:
- A black & white family portrait
- A handwritten quote or recipe from a grandparent
- A child’s colorful doodle
- A digital art print from Etsy
The best gallery walls don’t just look great.
They mean something.
Decide the Layout: Style That Matches Your Space

🎯 A Beautiful Wall Starts with a Smart Plan
You’ve got the frames. You’ve picked the art.
Now comes the part that trips up a lot of people:
“How do I actually arrange this on the wall?”
Don’t stress — you don’t have to be a designer to pull this off.
In fact, once you know a few layout styles (and a couple of tricks), it becomes kind of fun.
Let’s walk through your options — with real-life examples that fit different spaces and vibes.
🟨 1. Grid Layout – Clean, Classic, and Easy to Style
Perfect for modern or minimal homes.
This layout uses same-sized frames in evenly spaced rows and columns — like a tidy photo wall.
It’s great for showcasing:
- A series of family portraits
- Black & white photography
- Symmetrical art collections
📍Best Spot: Dining rooms, offices, or centered above furniture.
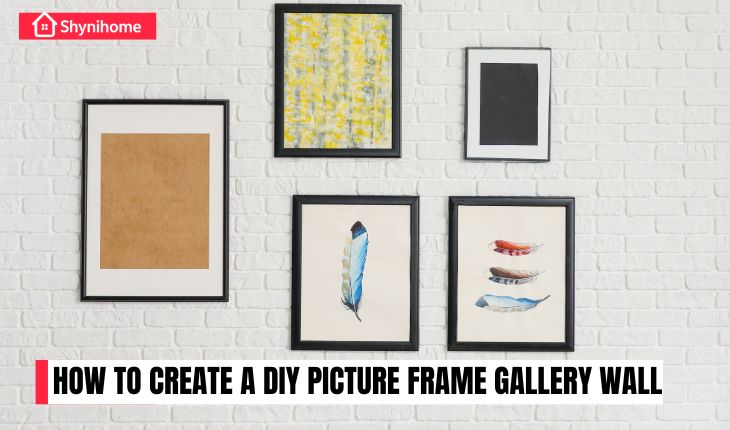
🎨 2. Salon / Freeform Layout – Collected Over Time Vibe
Want a wall that looks curated and creative?
The salon-style layout is more organic. You mix frame sizes, colors, and art types to feel like an art gallery.
This layout works well for:
- Eclectic collections
- Kids’ art mixed with quotes and photos
- A mix of travel prints, family, and found art
📍Best Spot: Living rooms, entryways, creative corners
📏 3. Linear Layout – Sleek and Streamlined
Think of this as a horizontal row — often hung above a sofa, headboard, or hallway bench.
Use matching or complementary frames to create a calm, intentional look.
You can also hang frames in two rows for a fuller feel.
📍Best Spot: Above furniture or long narrow walls
👉Related Article: 5 Easy DIY Furniture Projects for Small Spaces
⬈ 4. Staircase Climb Layout – Dynamic and Custom
This layout follows the upward slope of a stairway — and it’s surprisingly easy to pull off with painter’s tape.
Stick to a loose diagonal line that “climbs” with your stairs.
Use consistent spacing between frames, even if they’re different sizes.
📍Best Spot: Stairwells or angled hallway wall.
🧠 Layout Planning Tip: Don’t Skip the Mock-Up!
Before hammering anything in, do a quick dry run:
- Trace each frame on kraft paper or newspaper
- Cut out the shapes
- Tape them to the wall and move them around until it feels right
This is one of the easiest ways to prevent mistakes (and holes you’ll regret later).
✔️ Use painter’s tape so it doesn’t damage your wall
💻 Bonus Tool: Free Gallery Wall Layout Generator
Want to speed up the planning?
👉 Try a free layout generator to preview different arrangements.
We recommend this one: Gallery Wall Designer Tool by Artfully Walls
You can:
- Drag & drop frame sizes
- Test grid or organic layouts
- Match to real-life measurements
- Save and print your plan!
📍Pro Tip: Screenshot your favorite layouts to reference when hanging.
💬 Your Wall, Your Way
Whether you love crisp grids or cozy clusters, there’s no “right” layout.
The goal is to create something that feels balanced to you — in your space, with your art.
And guess what? If you change your mind, you can always rearrange later.
That’s the beauty of DIY!
Hang It Right: Tools, Tricks & Damage-Free Tips

🛠️ You’ve Got the Art — Now Let’s Get It on the Wall (Without Regrets)
This is the moment you bring your wall to life.
But hanging everything straight, level, and damage-free?
That’s where many DIY-ers freeze.
Good news: You don’t need to be a pro to get it right the first time.
Just a few easy tools — and a couple of renter-safe tricks.
✅ Must-Have Tools for a Hassle-Free Hang
Keep it simple. Here’s what you’ll need:
- Level – So nothing ends up crooked
- Hammer + nails – For traditional hanging (if allowed)
- Tape measure – Helps keep things evenly spaced
- Pencil + painter’s tape – Mark lightly, reposition easily
📏 The Rule That Saves Every Gallery Wall
Want to know the golden rule that designers use?
Hang your art so the center of the piece is between 57″–60″ from the floor.
That’s roughly eye level for most people — which means it’ll feel natural, balanced, and professional.
This trick works whether you’re hanging one frame or arranging a whole wall.
📐 Keep It Tight, But Not Cramped
If you’re creating a gallery wall with multiple frames, aim for:
- 2 to 3 inches of space between frames
- Consistent spacing across the entire layout
Too far apart? It feels disconnected.
Too close? It feels cramped.
🧩 Renter-Safe Hanging: No Nails, No Holes, No Problem
Don’t want to put holes in the wall?
Or maybe your landlord would not be thrilled?
Here are easy, damage-free ways to hang your gallery wall:
🟡 Command Strips
- Perfect for light to medium frames
- Come off cleanly — no residue or damage
- Bonus: many come with built-in level guides now
🟢 Velcro Hanging Tabs
- Great for heavier frames
- Allow for easy re-positioning before locking in
- Creates a secure, flat hold on the wall
🔵 Glue Dots / Blue Tack (for stabilization)
- Stick a small piece at the bottom corners of the frame
- Helps keep frames perfectly straight — even if someone bumps them
This stabilization trick is a total game-changer, and almost no blogs mention it — a quick win that looks pro-level.
💡 Pro Tip: Start with the Center Piece First
When building a gallery wall, pick one piece to act as your “anchor.”
Usually, it’s the largest or most eye-catching frame.
Hang that one at eye level, and then work your way out around it.
This creates a more natural flow and makes spacing easier.
🧷 Not Sure Yet? Test With Painter’s Tape First
Before sticking or hammering, mock up your layout with painter’s tape outlines on the wall.
It lets you adjust positions without commitment
❤️ No Damage, No Drama — Just a Wall You’ll Love
You don’t need fancy tools, a power drill, or drywall anchors to create a statement wall.
Whether you’re in a rental, a dorm room, or just want to skip the mess, these no-fuss options let you create a gallery that looks amazing — and leaves no trace behind.
Add Personality & Depth (Go Beyond Flat Frames)

🎉 Your Wall Can Be More Than Just… a Wall
A gallery wall doesn’t have to be just pictures in frames.
Want to make yours truly stand out?
Add dimension, texture, and personal touches.
This is where your wall transforms from “pretty” to show-stopping.
🪴 1. Use Floating Shelves for a Curated, Layered Look
Floating shelves let you play with depth and changeability.
You can layer:
- Small framed prints
- Candles or ceramics
- Souvenirs from travels
- A favorite book or two
The best part? You can re-style it seasonally without making new holes.
🪞 2. Mix in Mirrors, Shadow Boxes & Other Unexpected Layers
Not everything on your wall needs to be flat.
Try mixing in:
- Mirrors (especially small, round ones for contrast)
- Shadow boxes with keepsakes like concert tickets or baby shoes
- Pressed or dried florals in floating glass frames
These add variety and visual interest while staying cohesive with your overall theme.
✨ 3. Add 3D Objects Like Wood Letters or Small Sculptures
This is a fun way to make your wall interactive and personal.
A few ideas:
- Wooden initials or last name above a family photo cluster
- Mini sculptural pieces (like a ceramic hand or small bust)
- Wall-mounted planters or baskets for texture
These work especially well if your layout feels a little too “flat” — or if you want to add a pop without changing the art.
🌿 Bonus Tip: Keep It Balanced, Not Busy
When adding 3D items or layers, just make sure you’re balancing the overall layout.
A good rule of thumb:
For every 4–5 frames, add one layered or dimensional element.
This keeps your wall feeling curated, not cluttered.
And if you’re unsure, step back and take a photo — sometimes the camera shows what the eye misses!
💛 Let the Wall Tell Your Story
What makes your wall special isn’t the size of the frames or the cost of the prints.
It’s the mix of elements that reflect who you are.
Layering in textures, objects, and personal touches is what gives your gallery wall that magazine-worthy feel — without losing your story.
Make It Seasonal (Optional But So Fun!)

🍂 Turn Your Gallery Wall Into a Year-Round Mood Board
Want to keep things fresh without starting from scratch every time?
Here’s the secret:
Design your gallery wall to evolve with the seasons.
It’s easy. It’s fun. And it makes your home feel like it’s always in tune with the moment — whether it’s cozy fall, festive winter, or breezy summer.
🖼️ Start With “Anchor Frames” That Are Made to Be Swapped
Think of these like rotating display spots.
Choose 1–3 frames in your gallery wall that are easy to reach and easy to open — we’ll call them your “anchor frames.”
Use these to rotate seasonal content like:
- Autumn leaves, cozy quotes, or family pumpkin patch photos
- Holiday prints (think: minimalist Christmas trees or Hanukkah blessings)
- Spring florals or even your child’s latest school drawing
- Summer vacation photos or vintage travel posters
💡 Use Hinged-Back Frames for Easy Changes
Save yourself time and tape.
Look for frames with hinged backs (the kind that swing open).
They make swapping art as easy as flipping a page.
This also helps preserve the frame’s structure — no more bending metal tabs or pulling out nails.
📦 Store Unused Prints the Smart Way
When you’re rotating seasonal art, the last thing you want is a pile of crumpled prints.
Here’s how to store extras safely:
- Flat file folders or art portfolios: Great for larger prints
- Plastic document sleeves in a binder: Ideal for letter-size or smaller
- Labeled envelopes: Keep themes organized by holiday or mood
Slide them behind your sofa, under your bed, or in a closet drawer — out of sight, but ready when you need them.
🎨 Don’t Forget the Little Details!
To really lean into the season, you can also:
- Add a seasonal garland or mini wreath near your gallery wall
- Tuck in themed objects on nearby floating shelves
- Use washi tape to outline certain frames in festive colors
These tiny tweaks make a big impact — and keep your space feeling fresh without buying new decor every year.
🧡 Celebrate Every Season, Without Redecorating from Scratch
Making your gallery wall seasonal isn’t just fun — it’s smart.
It gives your home a sense of rhythm, and your walls stay relevant without ever feeling stale.
And the best part?
You’re not just decorating — you’re curating memories.
Common Mistakes (So You Don’t Make Them)
🚫 Messy Wall? Nope. Just a Few Easy Fixes Away!
If you’ve ever stood in front of a blank wall thinking,
“What if I mess it up?” — you’re not alone.
Here’s the truth: most gallery wall “fails” come down to just a few tiny missteps.
The good news? They’re all super easy to fix — or even better, avoid!
Let’s walk through them together. 👇
🎯 Mistake #1: Hanging Frames Too High
You don’t need to be tall to appreciate art.
The sweet spot?
Center of your artwork should sit around 57–60 inches from the floor — that’s eye level for most people.
👉 Use a tape measure to find that magic center point before you start placing anything.
📏 Mistake #2: Forgetting About Spacing
Too close, and it feels cramped.
Too far, and the pieces lose connection.
Ideal space between frames? About 2 to 3 inches.
A simple way to test?
Cut out kraft paper or newspaper the size of each frame and tape them up first.
It’ll help you see the spacing without committing just yet.
🖼️ Mistake #3: Only Using Photos
Don’t get us wrong — photos are lovely.
But when it’s only smiling faces, the wall can feel flat or repetitive.
Mix in:
- Art prints
- Quotes
- Textures (like a woven piece or fabric swatch)
- Even a mirror or two!
This mix adds variety and gives your eyes something to explore.
📌 Mistake #4: Not Starting from the Center
One common beginner trap is working left to right or top to bottom.
Instead, always start from the center — especially with asymmetrical or freeform layouts.
Place your largest or anchor piece in the middle, then build outwards like a puzzle.
It helps your wall stay balanced and intentional, no matter the style.
😅 Mistake #5: Overplanning Into Paralysis
This one’s real. You sketch, tape, measure, rethink… then don’t hang anything at all.
Perfection is great — but progress is better.
Your wall doesn’t need to be “Pinterest-perfect” on day one.
Start with a few key pieces. Live with it. Add as you go.
Remember: it’s your wall. It can grow with you.
💬 Quick Recap: Mistakes to Avoid
✅ Hang at eye level (57–60″)
✅ Space frames ~2–3″ apart
✅ Mix in more than just photos
✅ Start from the center
✅ Don’t let fear stop you from starting!
❤️ Done Is Better Than Perfect
Your gallery wall is supposed to be personal and a little imperfect.
It’s about memories, moments, and creativity — not rules.
So hang it, tweak it, live with it — and enjoy seeing your story on the wall.
Visualize It First: Try Free Mockup Tools
🎨 See It Before You Hang It – No Holes, No Stress!
Let’s face it—imagining how your gallery wall will actually look once it’s on the wall is tough.
That’s where free tools come to the rescue!
With just a few clicks, you can drag, drop, and rearrange your layout without ever picking up a hammer.
🖼️ Why Mockups Save Time (And Mistakes)
Mockups help you:
- Try different layouts (without committing)
- Balance colors and frame sizes
- Spot awkward gaps before they happen
- Feel confident before you hang a single piece
Whether you’re a visual learner or just want that extra boost of certainty—this step makes the whole process faster and more fun.
✅ Free Tools You Can Start Using Today
Here are a few totally free (and beginner-friendly) tools to test-drive your dream wall:
🖌️ 1. Canva – Free & Easy Room Mockups
- Use the “Room Wall Art Mockup” templates
- Upload your own images or use built-in art
- Drag and resize frames however you like
🔗 Canva Mockup Templates
🛋️ 2. Roomstyler – See It in 3D
- Build an actual room layout
- Add furniture, wall art, lighting
- Perfect for previewing wall styles in living rooms or bedrooms
🔗 Roomstyler
🎯 3. Reddit’s Gallery Wall Generator – Hidden Gem!
- Shared by real DIYers
- Simple drag-and-drop design
- Layout suggestions from actual homes
🔗 Gallery Wall Generator on Reddit
📝 Bonus: Download Your Free Printable Planning Worksheet
Want to go analog?
Download this printable worksheet to:
- Sketch out your wall
- Track frame sizes
- Plan the layout by hand before you drill or stick
❤️ Confidence Starts with Clarity
These mockup tools and printables aren’t just nice extras—they’re your safety net.
They take the guesswork out of the process and turn “I think this will look good” into
“YES, this is the one!”
Whether you’re a planner or a spontaneous creative, seeing your wall come to life before you commit makes all the difference.
👉 Also Read: DIY Projects for Beginners: Build, Create & Upgrade Your Home
You’ve Got This — Let Your Wall Tell the Story
✨ Perfectly Imperfect Is Still Beautiful
Here’s the truth:
There’s no one “right” way to make a picture frame gallery wall.
You don’t need to follow every trend.
You don’t need to spend a fortune.
You don’t even need to get it perfect the first time.
What you do need?
A bit of creativity, a touch of patience, and a willingness to tell your story — your way.
🎯 This Isn’t a Showroom — It’s Your Life on Display
Every frame, every photo, every quote or drawing on that wall has a meaning.
It’s not just decoration.
It’s your memories, your people, your travels, your favorite colors, and your imperfectly perfect style.
Don’t stress about straight lines or matching tones.
That quirky postcard from your trip to Rome?
That wrinkled but adorable drawing from your 5-year-old?
They belong there.
👉 Also Read: How to Build a Garden Bench from Leftover Wood
🫶 Ready to Share Your Story?
We’d love to see how your gallery wall turned out!
📸 Snap a photo of your finished wall
📲 Share it on Instagram or Pinterest
🏷️ Don’t forget to tag us with #MyDIYGalleryWall
💬 Final Encouragement: Start Now, Edit Later
Don’t wait for the perfect layout, the most expensive frame, or the “right time.”
Start small.
Hang one piece.
Then another.
Your wall will grow and evolve — just like your story.
Let your walls speak.
Because the best gallery wall is one that makes you smile every time you walk by.