

I’m sharing a simple way to make a DIY Vertical Herb Garden Using Plastic Bottles. It’s perfect for balconies, small patios, and sunny spots indoors. This project is all about saving money and reducing waste by using common plastic bottles.
It’s designed for beginners to grow fresh herbs all year with little effort. You’ll learn how to pick the right spot, choose the best bottles, and gather tools and materials. There are three ways to build it: wall-mounted, freestanding, and hanging.
You’ll also get tips on planting and caring for your herbs. Plus, how to fix common problems and which herbs grow well in small spaces. I’ll share advice from experts on container gardening and how to clean plastics safely.
Remember, safety is key. Clean bottles with warm soapy water and let them dry. Wear gloves and eye protection when cutting. Choose the right fasteners to avoid damaging walls or railings. Building it usually takes 2–4 hours, and it can cost less than $20 if you use recycled bottles. With proper care, your bottle garden can provide enough herbs for your cooking needs.
Key Takeaways
- A Vertical Herb Garden made from plastic bottles is low-cost, space-efficient, and sustainable.
- The guide teaches how to select site, bottles, tools, and three assembly styles.
- Follow Cooperative Extension and EPA cleaning recommendations for safe container gardening.
- Wear gloves and eye protection when cutting bottles and use proper fasteners for mounting.
- Typical build time is 2–4 hours; cost often under $20 with recycled materials.
👉 Also Read: How to Make Compost at Home – A Simple Guide
Why I Chose a DIY Vertical Herb Garden
I wanted to grow fresh herbs in my apartment easily. A vertical garden with plastic bottles was perfect. It fits on a narrow balcony and looks clean and green.
Benefits of vertical gardening in small spaces
Vertical gardens use space better. I can fit many plants where I had just one. This includes basil, cilantro, and chives.
Planting vertically helps air move better and fights diseases. It’s also easier to pick herbs when they’re at eye level. My garden follows good practices for growing in containers.
Environmental impact of repurposing plastic bottles
Using old bottles saves the planet. It keeps plastic out of landfills. I make my garden eco-friendly by using recycled bottles.
I clean each bottle before planting. The EPA helps me know when to reuse or recycle bottles.
Cost savings and accessibility for beginners
It’s cheap because bottles are free. The main cost is potting mix. I use basic tools to build my garden.
This project is great for beginners. It’s easy to do and doesn’t cost much. It’s a good way to try vertical gardening before buying expensive systems.
Planning Your Plastic Bottle Herb Garden
I planned this vertical herb garden for a sunny balcony and a tight budget. I considered sun, wind, bottle sizes, and mounting options. A good plan saves time and keeps plants healthy.
Choosing the right spot is key for plant health. Most herbs like basil and rosemary need lots of sun. I put these in sunny spots.
For less sun, I use mint and parsley. They do well in shade.
I check the area before hanging anything. Walls can get hot, and balconies can be windy. I use apps or watch the sun to plan. Windbreaks and strong attachments keep bottles steady.
I choose PET bottles from 16 ounces to two liters. Big bottles are good for herbs like basil. Small bottles are better for herbs like chives.
Shape is important for mounting and spacing. Some bottles fit well together. Others work for self-watering setups.
I pick between wall-mounted, freestanding, or hanging setups. Wall-mounted saves space and looks good. I use bolts or anchors for a strong hold.
Freestanding towers are easy to move. They follow the sun. Hanging systems work on railings and porches.
I think about permanence, sun, wind, and weight when choosing. This helps me pick the right setup for my garden.
Materials and Tools I Use for a Plastic Bottle Herb Garden
I keep things simple so anyone can make a plastic bottle herb garden easily. I use clean PET bottles as planters. I add new supplies for soil health and use common tools for a quick build. This setup supports eco-friendly gardening and fits most plans.
Recycled materials and new supplies I rely on
I collect PET bottles from 16 oz to 2 L for planters. I save old twine or nylon rope for hanging. Scrap pallet wood makes sturdy frames, and used eye hooks or S-hooks are great for attachment.
For new supplies, I buy quality potting mix and organic fertilizer. I prefer peat-free mixes like Pro-Mix and slow-release fertilizers. This keeps my garden healthy and eco-friendly.
To manage drainage, I use landscape fabric or coffee filters. I also have zip ties and stainless-steel screws or toggle bolts. Optional items like coconut coir and seed-starting plugs help too.
Tools that make the build easier and safer
I cut bottles with a sharp utility knife and heavy-duty scissors. A cordless drill with hole saw or drill bits makes mounting easy. I use hot glue or waterproof silicone for sealing.
Wearing gloves and safety glasses is key. I also have a rounded rasp or sandpaper for smoothing edges. Pliers, measuring tape, and a marker help with layouts. For mounting, I use a stud finder and masonry bits.
Where I source affordable or free supplies in the United States
I get free bottles from my recycling and use Nextdoor or Freecycle for more. Grocery stores sometimes donate bottles if asked. Friends and local swaps often give away twine, wood, or hooks.
For affordable buys, I visit Home Depot and Lowe’s for tools and anchors. Garden centers have potting mix and organic fertilizers. Amazon and Walmart.com are good for other supplies. Community resources offer discounts and free materials.
| Item | Purpose | Free Source | Affordable Buy |
|---|---|---|---|
| Assorted PET bottles (16 oz–2 L) | Planter bodies for herbs | Household recycling, Nextdoor | Local grocery bulk requests |
| Potting mix (peat-free or Pro-Mix) | Healthy, lightweight growing medium | Rare from community swaps | Garden centers, Home Depot |
| Slow-release or liquid fertilizer | Nutrient supply for herbs | Occasional garden club giveaways | Nurseries, online retailers |
| Zip ties, twine, eye hooks | Attachment and hanging | Freecycle, neighbors | Amazon, Walmart, hardware stores |
| Drill, hole saw, rasp | Cutting, mounting, smoothing | Tool libraries, community centers | Home Depot, Lowe’s, specialty tool shops |
| Landscape fabric / coffee filters | Drainage barrier in bottles | Sometimes from community swaps | Garden centers, online |
| Anchors, toggle bolts | Secure mounting to walls or decks | Rare via donations | Hardware stores, Home Depot |
| Optional: coconut coir, perlite | Improve moisture retention and drainage | Occasional community exchanges | Garden centers, online marketplaces |
Step by Step Plastic Bottle Vertical Garden
I’ll show you how to make a plastic bottle vertical garden on your balcony. This guide will help you prepare bottles, choose how to assemble them, and plant herbs. You’ll learn to make a vertical herb garden from plastic bottles easily.
Preparing bottles: cleaning, cutting, and drainage
First, I clean each bottle with warm, soapy water and a brush. If it’s sticky, I use a brush. Then, I rinse and let it dry to avoid mold.
For cutting, I mark the bottle and use scissors or a knife. This makes a pocket or a top-open planter. I sand the edges or heat the rim for safety.
Drainage is key. I punch holes in the bottom or side for water to flow out. I add gravel or pot shards and a coffee filter to keep soil in.
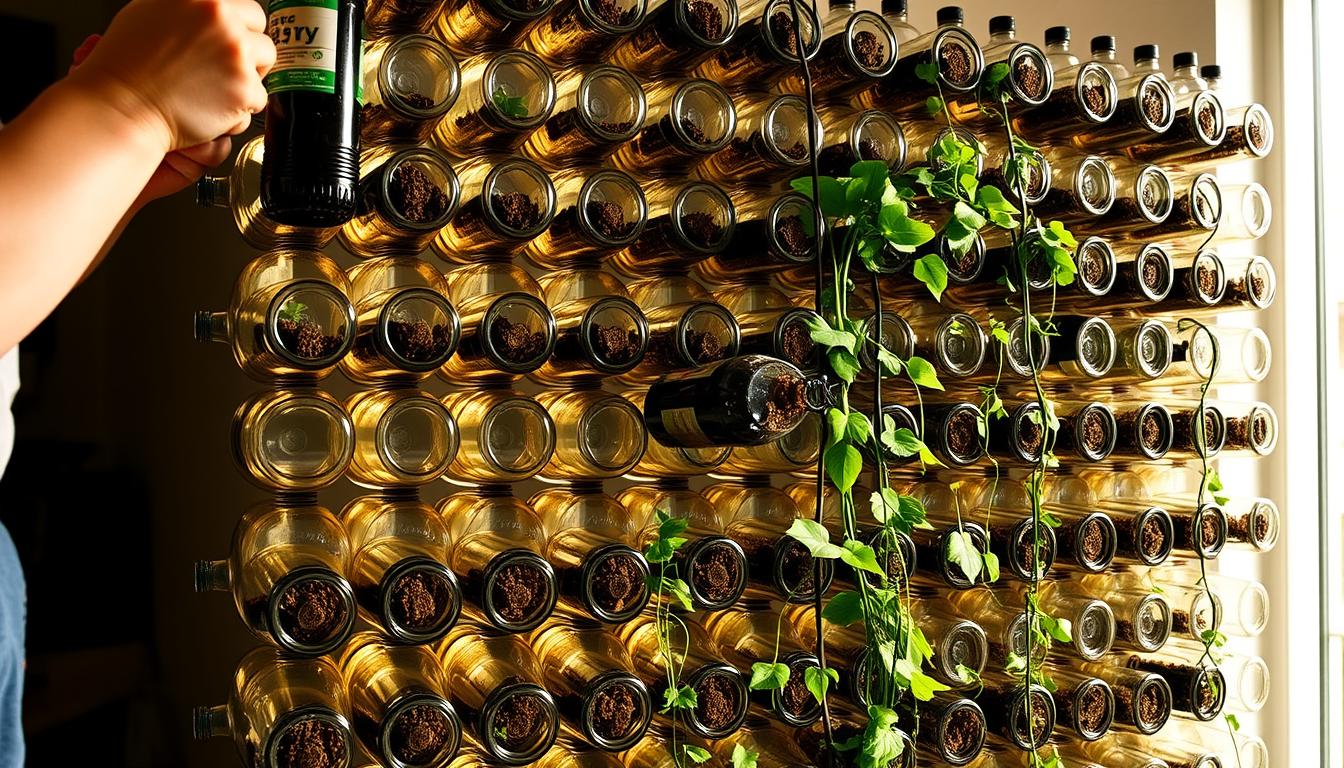
Assembly options: stacking, attaching, and suspending bottles
For a wall garden, I cut a flat back on each bottle. I attach them to a board with screws and washers. Zip ties work well for quick mounting.
For a freestanding tower, I stack bottles around a PVC pipe. I use a stable base and anchor each level. Sometimes, I insert smaller bottles into larger ones for stability.
For hanging, I thread twine or rope through the necks. I use S-hooks or clips to hang the line. I space bottles evenly and balance the weight.
I sometimes add a gravity-fed irrigation line. I use a reservoir bottle, tubing, and micro-drippers. A long-spout watering can works for hand-watering.
Filling, planting, and initial watering tips
I use a light potting mix with perlite or coarse sand. I fill bottles loosely to avoid compacting soil. I leave room at the top for watering.
I plant small starts or seedlings. For seeds, I follow packet instructions. I water until runoff appears, then check moisture after 24 hours.
I label each bottle with the herb name and planting date. For longer watering gaps, I add a cotton wick. This setup helps in hot months.
Vertical Herb Garden
I show you how to make a diy vertical herb garden. It saves space and looks good. I talk about layout, companion planting, and patterns for balconies, fences, and porches. This helps you find a style that fits your home and schedule.
Layout ideas for maximizing space and aesthetics
I use staggered rows to give each plant light. This keeps the design airy. For narrow walls, I use tiered lines for compact symmetry and easy watering.
Space planters 4–8 inches apart, depending on the herb size. Put taller herbs at the top or back to avoid shading. For a neat look, paint bottles or wrap them in outdoor fabric with matching twine and labels.
Companion planting and arranging herbs by light/water needs
I group sun-loving herbs like basil and rosemary together. Place them on the brightest tier. Partial-shade herbs like parsley and mint go in lower tiers. This makes care easier.
For water, put drought-tolerant herbs like rosemary in shallower bottles. Moisture-loving herbs like basil go where drainage is slower. Mint gets its own bottles to prevent it from spreading.
Examples of vertical patterns and designs I recommend
- Herb wall: a 3×4 grid of 1 L bottles on a fence. It’s dense and easy to access, perfect for small yards.
- Rail planter: three bottles per railing segment. It’s great for balconies and keeps things tidy.
- Hanging column: a string of bottles from a porch ceiling. It adds height and movement to small porches.
- Self-watering tower: a central reservoir bottle feeds five planters. It’s good for hot, dry balconies.
I test each pattern with simple bottle garden ideas before building. This lets me adjust spacing, light, and water. For many, starting with a small rail or wall panel is a good beginning.
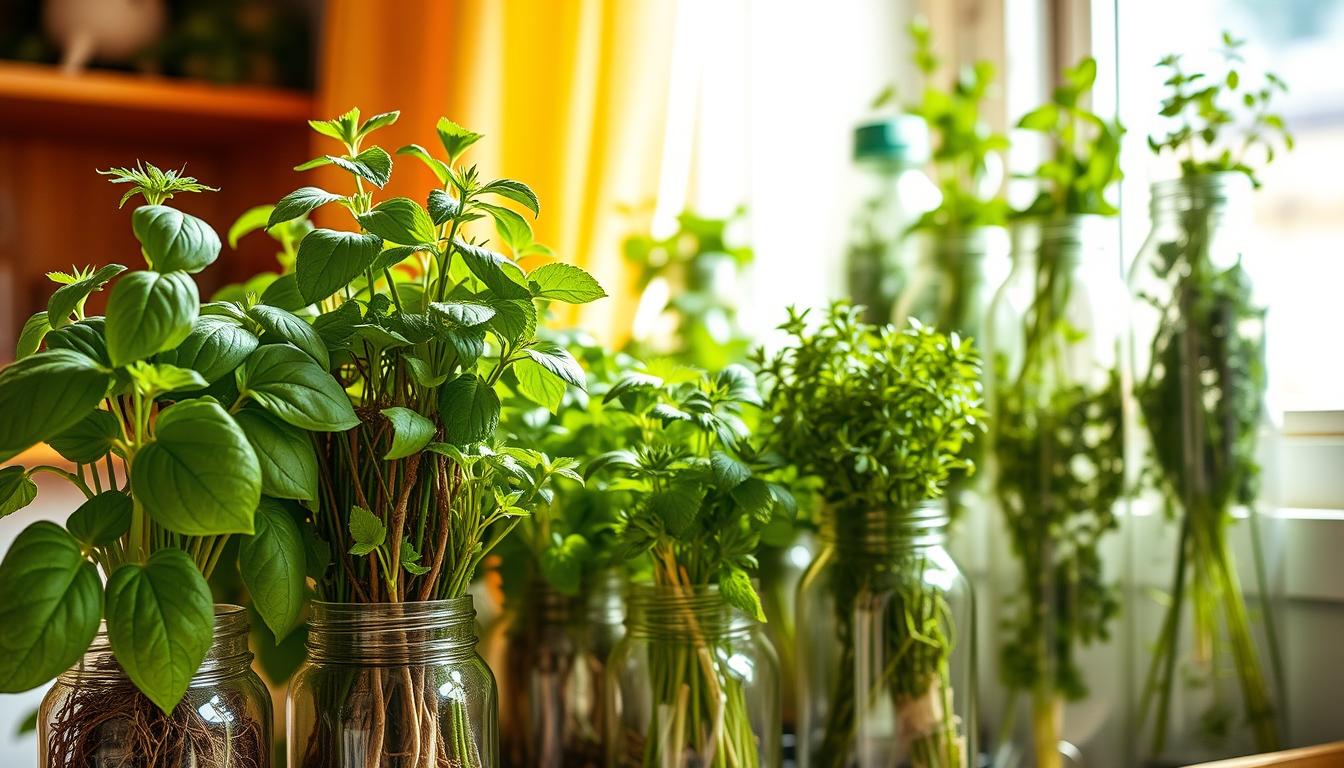
Best Herbs to Grow in Plastic Bottles
I have a list of herbs that grow well in small spaces. They fit my plastic bottle garden plans. These herbs give me quick harvests and save space.
Herbs that thrive in small containers
Basil is great for 1–2 L bottles. It needs lots of sun, steady water, and warm weather. I pinch its shoots to keep it bushy.
Mint does well in small spaces. I give it partial shade to prevent leaf scorch.
Cilantro likes cool weather. I plant it in shallow bottles and move them to shade in summer.
Chives have shallow roots and like cool weather. I harvest them often to encourage fast growth.
Other good candidates and container tips
Parsley, thyme, oregano, and dill are also good choices. Parsley and oregano like moderate moisture. Thyme needs a well-draining mix. Dill grows big, so I use taller bottles.
Perennial vs. annual herbs and care differences
Perennials like rosemary, thyme, and oregano come back every year. They need good drainage and less water. I check their roots and prune or repot as needed.
Annuals like basil and cilantro finish their life cycle in one season. I replace them when they bolt or decline. I start new seedlings or transplant from garden centers.
To keep herbs alive in cold weather, I move them indoors or to a protected porch. I cut back on watering and adjust the light slowly.
Herbs to avoid or use with caution
Sage and large fennel have big roots and don’t do well in small bottles. Woody shrubs like bay laurel need deep pots and a long-term plan. If I try these in bottles, I root-prune and repot often.
Aggressive spreaders like lemon balm must be in separate bottles. This keeps my garden balanced and productive.
Maintenance and Troubleshooting for DIY Bottle Gardens
I keep my bottle garden healthy by checking plants often. I fix small problems fast. Small containers dry out quickly, so I use a simple daily check at first.
This short routine saves time and keeps herbs thriving in tight vertical spaces.
I learned that a steady watering rhythm prevents stress. For diy vertical gardening for beginners, I recommend the finger test: press 1–2 inches into the soil. Water until liquid runs from the drainage holes, then let the top soil dry slightly.
Hanging setups and sun-exposed rows need water more often.
To cut chores, I add self-watering wicks or a basic drip line. These reduce daily work and keep moisture consistent. Always check for trapped water on bottle ledges. Standing water invites root rot, so good drainage is essential.
Watering routines and avoiding overwatering
I follow a simple plan and adjust to what plants show me. Deep watering followed by a short dry period works well. Watch for yellowing leaves or mushy stems—those are signs to reduce water.
For beginners, using saucers briefly can help diagnose leaks and pooling.
Pest management and natural remedies I use
I scout weekly for aphids, spider mites, whiteflies, and slugs. A strong spray from a hose often removes soft-bodied pests. For persistent infestations, I use insecticidal soap or diluted neem oil, following label instructions for edible plants.
I make a gentle soap spray and a garlic-pepper deterrent for quick spot treatments. I always test any spray on one leaf before treating the whole plant. To attract helpful insects, I place small flowering pots nearby.
I avoid broad-spectrum pesticides that harm bees and ladybugs.
Pruning, fertilizing, and winter care for vertical setups
I prune by pinching basil and young shoots to encourage bushy growth. I harvest leaves, not whole stems, to keep plants productive. For nutrition, I use fish emulsion or seaweed liquid every 2–4 weeks during active growth.
At planting, I sometimes add a slow-release organic fertilizer following the package directions. In cold months I move portable bottles inside or to a garage when frost is forecast. I cut back watering and stop feeding while plants rest.
For perennial herbs I keep bright light indoors or add a small LED grow light. If roots crowd the bottle, I repot into a larger container or prune roots and refresh the potting mix. These steps address common vertical herb garden troubleshooting and help the system last season after season.
👉 Also Read: Beginner Urban Gardening: A Simple Guide
Conclusion
My DIY Vertical Herb Garden Using Plastic Bottles shows how common items can become a productive garden. I used bottles to reduce waste and save space. Now, I harvest fresh basil, cilantro, and chives right by my kitchen.
This garden is a great example of urban gardening that’s easy on the wallet. It’s perfect for small spaces like patios and balconies.
Here’s what I learned: choose a sunny spot and pick bottle sizes based on each herb’s needs. Make sure each bottle has drainage. Group plants by their light and water needs to keep them healthy.
For success, water regularly, prune often, and use organic pest control. This keeps your garden thriving.
If you’re new to vertical gardening, start by gathering bottles and planning your layout. Try different setups like wall-mounted, hanging, or freestanding. This project is great for beginners because it’s easy and affordable.
Check out local gardening resources for tips and supplies. Visit hardware stores for mounting materials. Join gardening groups for ideas and to swap materials.
I started with recycled soda bottles and basic soil. It changed how I get fresh herbs and manage waste. If you follow these steps, your garden will flourish. Try making your own plastic bottle herb garden for fresh flavors and satisfaction.
FAQ
What is a DIY vertical herb garden using plastic bottles and who is it for?
This project turns clean PET bottles into vertical planters. It’s perfect for city balconies, small patios, and sunrooms. It saves space and money, and you can grow herbs all year.The guide covers choosing the right spot, bottles, tools, and how to put it together. You’ll learn about planting, caring for your garden, and fixing problems. It also suggests which herbs to grow.
How long does the project typically take and how much will it cost?
It takes 2–4 hours to set up a basic system. If you use recycled bottles, it costs less than $20. You’ll need potting mix, zip ties, and fasteners.Looking after your garden is easy. Just water, feed, and prune your herbs. This way, you’ll have enough herbs for cooking.
Which herbs grow best in plastic bottles?
Choose herbs like basil, chives, cilantro, mint, parsley, thyme, oregano, and dill. These grow well in shallow to medium-rooted plants. Rosemary and thyme are good in well-draining bottles but might need pruning.Avoid big-rooted plants like sage or large fennel unless you have big containers.
What bottle types and sizes should I use?
Use PET soda and water bottles from 16 oz to 2 L. Small bottles are best for chives and cilantro. Use 1–2 L bottles for basil and parsley.Look for bottles that are square-sided or flattened for mounting. Make sure they’re clean and didn’t hold hazardous chemicals.
How do I prepare bottles for planting—cleaning, cutting, and drainage?
Rinse bottles well and soak them in warm soapy water if they’re sticky. Use a bottle brush to clean inside and let them dry.Mark where to cut and use a sharp knife or scissors. Drill holes for drainage and add gravel or a coffee filter to prevent soil loss. Sandpaper or briefly flame the cut edges for safety.
Which assembly methods work best: wall-mounted, freestanding, or hanging?
All methods work well, depending on your space. Wall-mounted systems save space and look good. Use toggle bolts for drywall or masonry anchors for brick.Freestanding towers are portable and good for changing light. Hanging systems are great for railings and porches. Make sure they can hold the weight of filled bottles.
How do I water bottle planters and avoid overwatering or root rot?
Check soil moisture by feeling it 1–2 inches down. Water deeply until you see runoff, then let it dry a bit before watering again. This prevents root rot.For less frequent watering, add a wick or gravity-fed drip system. Improve drainage with perlite or coarse sand in the potting mix.
Can I set up a simple irrigation system for my bottle garden?
Yes. Use a gravity-fed drip system with a reservoir bottle and small tubing. Or, run a cotton wick from the reservoir to each bottle for self-watering. For small projects, hand-watering works well but you’ll need to water more often in hot, windy places.
What safety and sanitation steps should I follow when reusing bottles?
Wash bottles well with warm, soapy water and rinse them. Don’t use bottles that held hazardous chemicals or oily products. Wear safety gloves and eye protection when cutting plastic.Use the right anchors for walls and railings. Spread the load with washers or a sturdy frame to avoid failure.
How should I arrange herbs by light and water needs in a vertical layout?
Group herbs by light and water needs. Put sun-lovers like basil and rosemary in the brightest spots. Place partial-shade herbs like cilantro and mint on lower tiers.Pair drought-tolerant herbs in well-draining bottles. Moisture-loving herbs should get more consistent water.
What pests and diseases should I watch for and how do I treat them organically?
Watch out for pests like aphids and slugs. Use manual removal, a strong water spray, or insecticidal soap as first treatments. Encourage beneficial insects by placing the garden near flowers.For diseases, remove affected leaves, improve air circulation, and adjust watering to prevent root rot.
How do I overwinter herbs grown in plastic bottles in cold U.S. climates?
Move portable planters indoors or to a sheltered area before frost. Reduce watering and stop fertilizing during dormancy. Provide bright light or use a grow light for perennial herbs.For tender annuals, treat them as seasonal and replant in spring.
Where can I source affordable or free materials and supplies in the United States?
Get bottles from recycling, ask neighbors, or check Freecycle and Nextdoor. Affordable supplies are at big-box stores, garden centers, and online. Local garden clubs and university Cooperative Extension offices are also helpful.
What are simple design ideas for making my bottle garden look attractive?
Use staggered or tiered layouts for light and interest. Paint bottles or wrap them with fabric for color. Add labels, twine, or different bottle sizes for texture.Examples include a 3×4 herb wall, a rail planter, or a hanging column with large and small bottles.
How often should I fertilize and prune herbs in bottle planters?
Fertilize with organic liquid fertilizer every 2–4 weeks during growing season. Use slow-release granular fertilizer at planting. Prune often to encourage growth.For perennials, prune roots or repot them to prevent root-bound conditions in small bottles.
Are there herbs I should avoid or plant with caution in bottle gardens?
Avoid large-rooted herbs like mature sage in small bottles. Aggressive spreaders like lemon balm need confinement. Woody shrubs like bay laurel require deeper pots and long-term repotting.
Where can I find more region-specific planting guidance and troubleshooting help?
Use Cooperative Extension publications for planting advice. Local extension offices, community garden groups, and university horticulture departments offer practical help. For plastic reuse and cleaning, consult the U.S. Environmental Protection Agency and local recycling programs.